E13 | Ridgewood Colonial Revival | The Kitchen Front
Season 46 Episode 13 | 23m 42sVideo has Closed Captions
Sound engineer Mike DiSalvo explains the components of sound proofing the kitchen.
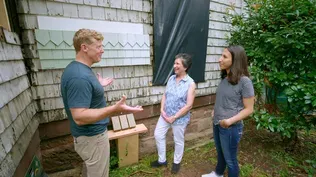
Kevin O'Connor meets Zack Dettmore outside where he explains the choice of using a composite wood siding to distinguish the addition from the original portion of the house and to keep the material low maintenance. In the kitchen, Sound engineer Mike DiSalvo explains the components of sound proofing a room to Kevin. Meanwhile, Zack visits a factory to learn how wood fiber insulation is made.
Funding for THIS OLD HOUSE is provided by The Home Depot and Renewal By Andersen.
Support provided by:


E13 | Ridgewood Colonial Revival | The Kitchen Front
Season 46 Episode 13 | 23m 42sVideo has Closed Captions
Kevin O'Connor meets Zack Dettmore outside where he explains the choice of using a composite wood siding to distinguish the addition from the original portion of the house and to keep the material low maintenance. In the kitchen, Sound engineer Mike DiSalvo explains the components of sound proofing a room to Kevin. Meanwhile, Zack visits a factory to learn how wood fiber insulation is made.
How to Watch This Old House
This Old House is available to stream on pbs.org and the free PBS App, available on iPhone, Apple TV, Android TV, Android smartphones, Amazon Fire TV, Amazon Fire Tablet, Roku, Samsung Smart TV, and Vizio.
Keep Exploring

This Old House Insider Newsletter
Get This Old House exclusive stories, tips, and behind-the-scenes information delivered right to your inbox every month.Providing Support for PBS.org
Learn Moreabout PBS online sponsorshipZack: Today we're installing composite siding that looks just like real wood.
And I'm touring this factory where they're brewing up a new type of insulation.
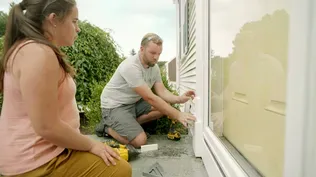
Kevin: And we're going to paint our PVC trim a dark color.
So we're going to learn how to prep it properly and pick the perfect paint.
♪♪ Man: Ahh.
That's it.
♪♪ ♪♪ ♪♪ Kevin: Hey there, I'm Kevin O'Connor.
And welcome back to "This Old House" and to our project here in Ridgewood, New Jersey, where we've got this 1930s colonial revival we're working on.
Now, you may recall that the homeowners and the architect didn't want to make many changes to the front part of the house.
They wanted to keep it as close to the original 1930s design as possible.
You can see that the trim and the siding are up.
Original shingles have been replaced by clapboards, and now we have a deep blue color that replaces the yellow.
The portico stays, even though it's been rebuilt, and the five window openings in exactly the same place.
Out back we have a two-story addition, and this is where the architect brought in some more of that modern look, and you can see what he did.
So we've got these big windows, single pane, and they come to a corner right here.
And they're flanked on either side, top and bottom by casement windows.
They also switched back to shingles, but just for the addition to distinguish it from the original house, which you can see right here that has got the claps on it.
And these two buildings, as they come together, makes my favorite part of the house, which is this little area right here.
It's going to be a patio for seating, and it's very private, and it's almost enclosed with the house right here.
You'll be able to access it right off of the kitchen from this door.
And you can also see that they introduced a third material just to distinguish the entryway and to trim it out.
We're actually installing that on the other side at that entryway as well.
Hey, Zack.
Zack: Hey, Kevin.
Kevin: Good to see you.
Zack: Likewise.
Kevin: Looking good.
I like the progress, and I like the pop of color.
Zack: It's looking really good, right?
Kevin: Yeah.
It is.
Zack: So, yeah, on the addition, we went with this cementitious shake product.
Kevin: Yeah.
Zack: And on the original house, we used clappers.
Kevin: Saw that.
Zack: And it was all prefinished, this blue color.
Kevin: Yeah.
So definitely low maintenance, which is nice, right?
Zack: It is.
And the homeowner really wanted a low-maintenance product.
But there was this wood element designed into it to break the two apart.
But they want it to look exactly like wood but they didn't want the maintenance of wood.
And there's a lot of sun exposure here.
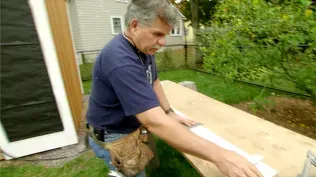
And so the homeowners actually found this composite product that looks a lot like wood compared to other ones we found.
And what do you think?
Does it fool the eye?
Kevin: You know, I saw it on the other side, and I'm looking at it on this side.
And from this distance, the grain looks right, the color looks right.
How'd they pull that little magic trick off?
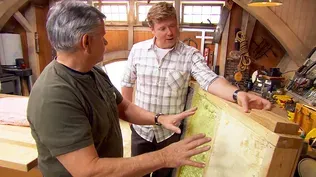
Zack: They take an oak board and they make a mold out of it.
Kevin: So a real board?
Zack: A real board, and then they actually -- so, we'll act like this is upside down -- hand-brush the paint on to get that variation of color.
And then they inject this rubber coating right here.
And that paint will bond to that.
And then they add this composite resin on top and compress that.
And that's how you get that assembly.
The fastener is going to come through right here through that line.
And then the second board is going to come and cover it up.
And that little tongue you see on the back is going to keep it from coming out here.
And there's no exposed fastener on the bottom.
Kevin: It sets its own reveal so you get that defined gap in each coursing.
Zack: Exactly.
Kevin: I got to say it works.
You know, like I said, the color's right, the grain is right.
And I guess the soft underbelly, this stuff, is usually the repeat.
You know, whether you see the pattern repeat itself.
Zack: Right.
So that's really interesting too.
They actually take these molds.
They make six of them per run and they'll make 500 boards.
And then they destroy the mold.
So it's very uncommon.
Kevin: Just get rid of it?
Zack: They just get rid of it, recycle it, make it into a new board.
Kevin: Wow.
Zack: So that's why you don't see many repeats here.
Kevin: On your house or the other person who uses it.
Wow, that's pretty impressive.
Zack: Yeah, it's pretty cool.
Kevin: Alright, so just for the entryways and accent piece going up right now?
Zack: Yeah.
So let me introduce you to Jose.
He's been doing this for 23 years.
He's amazing.
Kevin: Jose, nice to meet you.
Jose: Nice to meet you.
Kevin: I can throw in and help you out if you want.
Can I give you a hand?
Jose: Sure.
Yeah.
You can become my cut man.
Kevin: Yeah.
Jose: So you cut some boards.
Kevin: Alright, let me get my belt.
Jose: Okay.
The next measurement is 35 3/8.
[ Saw buzzing ] Thank you.
Kevin: So we're going to cut one course at a time or you want me to cut a bunch?
Jose: So we're going to cut one course at a time because, you know, sometimes the wall doesn't have the same measurements.
It's a little bit off.
So we have to cut one piece by one piece.
Kevin: So you have set your shorties against the wall and on top of the mesh.
Jose: Yes.
We install the short board first because we don't want to see, you know, the line is when you see from the front.
Kevin: Yeah.
Jose: You don't see -- The homeowner, they don't see any of those.
Kevin: Okay.
Jose: You know, but -- but from over here, you won't see it basically.
So that's why we installed the short one first.
But also one other thing that it has to be is straight.
Couldn't be like, you know, you know, too off.
So it has to be lining so the next course line up perfect over there, like you see in this one.
Kevin: So how'd I do on my cut?
Jose: You did perfect.
It's the best cut.
Kevin: Dry fit?
Jose: Yes.
So we have to -- You have to make sure, you know, it's luck.
Sometimes, you know, it's something behind.
That's when you do the cut, I wipe a little bit.
So make sure any dirt or anything hitting the groove.
Kevin: Yeah.
Jose: The next course luck.
Clean.
So we're gonna start with these screws, stainless steel for exterior that we're gonna put four screws over here.
So when we screw it, you're gonna send a little bit deep and then bring back.
Kevin: Oh, interesting.
So you're trying to get that screw head to actually dimple into the material, but not pull it too tight to the wall?
Jose: Yes.
Kevin: So you back it off.
Jose: Back it off.
We screw too deep, the next one is not going to lock.
♪♪ ♪♪ ♪♪ Kevin: Zack tells me that our rough inspection has been signed off on.
So we've got HVAC, plumbing and electric all in the walls.
We're ready to insulate.
The house has got three different types of insulation going in.
We've got a little bit of foam in the rafter bays upstairs, and then we're blowing in wood fiber insulation and also using wood fiber batts, pretty much the protocol throughout the house.
But here in the addition with the kitchen downstairs, bedroom upstairs, it's a little different because we're trying to control the sound.
And to help us do that, we've got an acoustic specialist, Mike DiSalvo.
Mike, nice to meet you.
Mike: Hey, Kevin.
Kevin: So, what's the day job?
What are you doing when you're not with us?
Mike: I travel and build recording studios for a lot of your artists, engineers and producers all over the country.
Kevin: So you're our guy?
Mike: I hope so.
Kevin: You got to make those things really tight, huh?
Mike: Yeah.
We do.
Kevin: How do we control sound?
Or in this case, how do we deaden sound?
Mike: So, there's three principles.
There's absorption mass and isolation.
Kevin: Okay.
So absorption, how do we do that?
Mike: Absorption would be a soft surface that essentially the sound wave travels into but gets caught and does not travel back into the environment.
Kevin: So if I buy acoustic panels or if I take foam and I put it on the ceiling or on the wall in my basement to make a little recording studio, that's absorption?
Mike: That's exactly absorption.
Kevin: Will we do that here?
Mike: We are not going to do that here.
It's a kitchen, so we're going to bypass that on this one.
Kevin: My teenager would put acoustic panels on these walls.
Mike: [ Laughs ] Kevin: So what was the next one?
Mass?
Mike: Mass, correct.
Kevin: How do we do that?
Mike: So, we're achieving that in this environment with the insulation and two layers of 5/8 drywall.
Kevin: So as I look up into the joist bay, we can see our batt insulation in this room, about three inches.
That's nice mass.
Mike: Yes.
Kevin: There's a big cavity behind it because we've got a deep joist bay.
Should we have filled that all the way up with insulation to meet your criteria?
Mike: No, we actually want that.
It's a sound-deadening chamber.
Kevin: Better to have a combination of the two, the gap and the mass?
Mike: Absolutely.
Kevin: No kidding.
And that's effective?
Mike: That's super effective.
Let me show you.
Kevin: Alright.
What do you got?
Mike: We've got a sound deadening chamber here that the guys constructed.
Kevin: A little homemade one here.
So we've got the -- we've got the fiber batts all around and a lid.
Mike: And essentially the plywood would act as your drywall.
Kevin: Okay.
You got some noise for us?
Mike: We do.
Kevin: What?
We got a speaker?
[ Theme music playing loudly ] It's pretty loud.
Mike: Pretty loud.
It's coming in about 112 DB.
You're measuring that?
Mike: Yep.
♪♪ And if you want to close it up... Kevin: So a little quieter.
[ Music quiets ] Holy smokes.
So that's very effective.
Mike: It's very effective.
Kevin: Can you kill that music?
It's delightful, but, uh -- [ Music stops ] There you go.
Alright.
So then the third way was what?
Mike: Isolation.
Kevin: How do we do that?
Mike: Essentially, these clips are what's going to isolate your joist.
This will act as the drywall.
Kevin: So we've got the joist up on the ceiling.
Mike: Right.
Kevin: We normally would have the drywall going right to it.
Mike: Right.
And the problem here that you're going to have is that any transfer, if this drywall vibrates, it'll transfer to the joist.
Kevin: So sound goes through vibration as well.
Or all vibration, right?
Mike: Exactly.
All vibration.
Yep.
Kevin: So what do you do?
Mike: So the way we're going to stop that is we're going to use one of these RSIC clips, which is essentially a rubber isolator that never touches the metal.
So if you take that and you put it in there, you've got a rubber footing that's catching any transfer.
Kevin: Very nice.
Mike: And then to decouple it even further, what you would do is it then goes on a hat channel, so you would screw the drywall into this hat channel, which would then go to the joist, and you're decoupling and taking all of that energy transfer out of that situation.
Kevin: So as I look up there, you have got the clips.
So we're going to take this channel and we're going to attach it to the clips going perpendicular to the bottom of our joists?
Mike: Mm-hmm.
Kevin: And then once the channel is up, our drywall guys can come and just screw to that?
Mike: Yep.
Kevin: Cool.
And as I put the drywall up, can I go to the perimeter or I mean, like, how do I manage that?
Because at some point it touches, doesn't it?
Mike: Well, ideally you want to leave about a 3/16 gap.
And then what we use is something called sound sealant.
And it's essentially a caulk that never dries.
It's a sealant and it basically takes care of that gap.
So the transfer never goes to the outside structure.
Kevin: So we never have the drywall on the ceiling touch the framing and around the perimeter.
We never have the drywall touch the perimeter framing, because you're telling me you're going to put basically a caulk gap right there?
Mike: Exactly.
Kevin: How much sound deadening do you think you can accomplish with this system?
Percentage-wise.
Mike: You're easily looking at about a 60% to 70% reduction in sound.
Kevin: Mama's going to sleep in on Sunday.
Mike: Exactly.
Yeah.
Kevin: That's awesome.
Mike: Yeah, pretty much.
Kevin: Alright.
So we're pretty close to being able to put drywall up.
Mike: You're pretty close to be able to put drywall up, yep.
Kevin: Very nice.
Thank you, Mike.
Appreciate it.
♪♪ On this project we're using a new high-performance insulation that starts off as wood chips and is turned into a wood fiber batt, or bags of loose fill that can be blown into the walls.
And we were curious to see how it was made.
So Zack took a trip up to Maine to have a look at the factory.
Zack: With Maine's massive supply of trees, the lumber and paper industries thrived here for over a century.
By the 1980s, however, a shift in economic forces led to the decline in paper production, and many of the processing mills were shut down.
But this mill, located on the Kennebec River, has been revitalized by finding yet another use for Maine's most abundant resource.
I met with co-founder Josh Henry for a tour.
Hey, nice to see you, Josh.
So, I've used the insulation on three projects now.
I'm pretty excited to see how it's made.
Josh: We're excited to have you.
Zack: What am I looking at here?
Josh: Well, we're just about to get a load in of fresh chips, which is our raw material feedstock.
Zack: Interesting.
So this is -- this is what's left over after they're milling trees down into lumber.
Josh: Yeah.
You take a round log, you cut it into squares, there's some round bits left over.
They chip that up and they send them to us and we make it into insulation.
Zack: That's pretty fascinating.
Josh: Maine's the most forested state in the country, right?
It used to be that we did a lot of paper manufacturing.
This used to be an old paper mill since the 1880s.
It shut down in 2016.
Everyone lost their job.
We bought it in 2019.
We've invested $150 million in getting it operational.
Zack: Wow.
Josh: So the chips that you saw in the yard outside are coming in onto our roof.
Zack: Right.
Josh: They're dropping down into this bin.
They're just getting acclimated to the temperature.
We're adding a little steam.
The chips fall down into here, and you can see them through the sight glass, making their way down into the process.
Zack: Yeah.
Josh: This is called a plugged screw feeder.
This is just forcing those chips into what's called our digester.
We don't use chemicals in our process.
We use high-pressure steam.
Zack: So that thing there is basically like a large pressure cooker and it's breaking down those chips with heat and pressure?
Josh: Yeah.
Just like you have in your kitchen.
This is just the industrial version of that.
Zack: It's a massive one.
Josh: So the chips are going to spend about four or five minutes in there, and then they're going to get pushed into the refiner.
The refiner is basically the heart of the process.
If anyone's ever been to like a mill process where you see millstones grinding corn or anything like that... Zack: Yeah.
Josh: ...we're doing the same thing here.
We're applying physical force.
But what we have in there is 42-inch stainless-steel plates with knives on them, and the chips are coming through the center, and they're being fed out through that less than a millimeter gap.
And they're going from that soft chip to a fiber in that process.
And then what we do is you can see there's a pipe coming through on the other side, and that pipe is under pressure and it's just shooting fiber out of there.
And as the fiber comes out, we're adding boric acid, a mineral.
And that's going to give it that Class A fire rating that we're looking for.
The borate is basically going to form like a glass on each individual fiber and make sure it won't burn.
Zack: Oh, that makes sense.
So where does it go from here?
Josh: We're going to go into our dryer.
And our dryer is basically a hair dryer.
So low-temperature air but driven with a jet engine.
So it takes six seconds to get from there -- from 100% moisture content to be a completely dry fiber and ready to be processed into our manufacturing process.
Zack: Got it.
So you've got a pressure pot, an old mill, and a hair dryer.
Josh: Exactly.
Zack: Alright.
Josh: Okay, so once the fiber comes out of the refiner that I just showed you... Zack: Yep.
Josh: ...it gets dried and then it comes down here.
It gets mixed with a dry polyester fiber, so that's about 3% by mass of the product.
You can't see it in here because it gets mixed homogeneously.
And once it gets to the end of this fiber bin, it's going to shoot the fiber up into the air.
And then it gently by gravity lowers down so that we get a low-density mat that you're seeing down here.
And then it's being moved into the oven.
The oven is kind of like a giant, you know, if you've been to a continental breakfast at your hotel, it's like a giant bagel toaster.
Zack: Yeah.
Josh: But it's high tech.
We have two giant steel belts and they're controlled by magnets.
And what those magnets are doing are making sure that belt gets perfectly down to the exact depth of your stud cavity.
Once it's there, it's going to hold it there for the entire duration of the oven.
And that's what's going to cure our resin.
Zack: It's just one long toaster.
Josh: Yep.
Zack: Very cool.
Josh: What we need from our batts is they need to be precision cut.
The width is set by these inline saws that we have, and they're adjustable.
So we can do 16 on center.
We can do 24 on center.
And this is my favorite part -- the flying crosscut saws.
Doesn't make any sense.
What you see is we're moving product continuously through here at six metric tons per hour.
And it's cutting it completely flush on the end.
So you get 48 inches every time.
Zack: It's so crazy how they're traveling at that angle, but it gives you a perfectly square cut.
Josh: I took geometry in elementary school, but I still don't really understand how this works.
Zack: It's just magic.
[ Laughs ] Josh: It gets stacked into a stack of four that then get wrapped.
Voilà!
You've got your end product.
Zack: There it is.
That's what I've seen on the jobsite.
Josh: And this is probably everybody's favorite machine.
This robot stacker makes a perfect 4x4, eight-foot-tall pallet.
Zack: The googly eyes are a nice touch too.
Josh: The googly -- [ Laughs ] We call him Dwight.
Zack: Oh, that's Dwight?
Alright.
I gotta say, this is an impressive facility.
It's great that you're revitalizing an old factory and bringing jobs back to this building.
Josh: Well, thank you.
Come back anytime.
Hope your customer enjoys it.
Zack: It's great to meet you.
It's great to see you, Dwight.
Take care.
♪♪ ♪♪ Kevin: Lazaros, good to see you again.
Lazaros: Hey.
How you doing?
Kevin: Alright.
So, Zack sent you outside for some painting.
We're doing trim?
Lazaros: Yes.
We're going to be painting this PVC trim.
Kevin: PVC trim?
Used to be people never wanted to paint it.
Now we can, but you can't treat it like it's regular wood.
Lazaros: Yeah, there's a couple of points you have to be careful of.
You have to use, one, 100% acrylic latex paint.
Kevin: Yeah.
Lazaros: And two, you have to watch the light reflective value of the color you're going to be using.
Kevin: Hold on a second.
100% acrylic I get.
I can get that.
Look right on the paint can, there it is.
What was the other metric?
Lazaros: The light reflective value of the color you're using.
So every paint color has a light reflective value.
And as you see if you get a paint chip from the store, you could turn it around and they'll have the light reflective value of it.
Kevin: Holy smokes.
I've never looked back there.
So this says light reflective value of 9, and then in parens "dark."
Lazaros: Yes.
Kevin: So what's the scale?
Lazaros: So a 1, it would be on the dark scale like a black.
And then 100 would be white.
So 100% reflects light, 1 absorbs the light.
Kevin: And what can we use?
Like, where is the break point?
Lazaros: The manufacturer recommends 55% or up.
Kevin: And I guess the idea there is -- I mean, we've learned in the past that you don't want to paint it too dark because it could absorb a lot of sunlight, heat up, and the PVC doesn't like that.
Lazaros: Yes, it bends, warps, it can melt.
Kevin: So how do we get around that for dark colors?
Lazaros: We get a special product with solar reflective pigment in it that allows us to go under the 55% mark.
Kevin: Could they make a dark color like this reflective enough?
Lazaros: Yes, they can.
You could custom-order the color in a solar reflective pigmented product.
Kevin: Huh.
So custom order.
I can't take -- buy a can of this and have them pour some magic elixir?
Lazaros: No, it's a product that's formulated for the reflecting purposes instead of absorbing.
Kevin: So is this our color that we're going with, with the proper pigment?
Lazaros: This is just a chip I had handy.
but we're going with a color that has a 15% light reflective value, and -- But it's in the product with the solar reflective pigments that allows us to go below that 55 threshold.
Kevin: So you ordered the right stuff?
Lazaros: Correct.
Kevin: Okay.
And in terms of prep work, what do you recommend?
Lazaros: Uh, not much.
Just you got to make it clean, a little bit of denatured alcohol, which I have right here.
So I'll let you do the honors.
Kevin: Got it.
So just cleaning.
No sanding?
Lazaros: No.
Just denatured alcohol.
Clean any dirt, dust on it.
The holes are plugged, and the caulking is done by the siding guys already from the siding and into the window, so no prep there needed.
Kevin: Alright, so let me just do this, and then I can help you paint as well.
Alright?
Yeah.
Lazaros: Alright.
Kevin: My light reflective number is about 98.
Lazaros: Yeah.
[ Laughs ] Kevin: It's an Irish thing.
Lazaros: Yeah.
We're going to have you paint this with the roller.
And I'll come behind you with the brush to brush it out.
Kevin: And what's your thought behind that process of applying with roller?
Lazaros: With a roller, you want to get the material on there... Kevin: Quickly?
Lazaros: ...quickly.
And then with the brush, you just brush it out to make it smooth, finish and aesthetically pleasing.
Kevin: You like to see those brush strokes?
Lazaros: Yes.
And we're going to have to try to keep a wet edge here.
So you're gonna have to move a little bit faster.
Kevin: Oh, my gosh, you're rushing me.
Nice.
Yeah, that's a good look.
There you go.
Lazaros: Got to cut in.
Kevin: Oh, look at that.
Better you than me.
My hands are not steady enough to do that.
Look at you.
So this is one of two coats?
Lazaros: Yes, one of two coats.
Correct.
Kevin: Very nice.
Alright.
A nice little shade of blue there.
Hey, Zack.
Zack: This looks awesome.
Kevin: Doesn't it?
And it's got the right, uh, values, light reflective values.
Zack: We're a company of good values.
[ Laughter ] Kevin: Like to see it.
Thank you, Lazaros.
Lazaros: Yeah, thank you.
Kevin: Zack, a lot of progress going quickly here.
What have we got next time?
Zack: I think next time we'll probably be done with drywall and flooring.
We'll be getting this patio in and maybe doing some tile in the bathrooms.
Kevin: That sounds very good.
Alright, well, until then, I'm Kevin O'Connor.
Lazaros: I'm Lazaros Poinditis.
Zack: And I'm Zack Dettmore.
Kevin: For "This Old House" here in Ridgewood, New Jersey.
♪♪ Kevin: Next time on "This Old House"... On our first-floor bathroom, we are using a large porcelain tile that has to be cut so our shower pan drains properly.
Man: Last piece.
Kevin: Okay.
Beautiful envelope cut right there.
Nice job.
Zack: So we folded the hardwood floor up the wall, and then we'll have sort of a concealed door.
Mark: And we're going to turn this boulder... Jenn: Into a water feature.
Kevin: Alright!
Jenn: Whoo!
Mark: Whoa, there it is!
Zack: Well done.


Funding for THIS OLD HOUSE is provided by The Home Depot and Renewal By Andersen.